Lightroom 4: Streamlining Your Digital Photography Process

Lightroom 4: Streamlining Your Digital Photography Process is a promotional item. To increase sales of the product. It can make you love it. Lightroom 4: Streamlining Your Digital Photography Process is a great product. Quality of work. Corresponds to a very And that it is affordable. I bought it from the Internet to use Lightroom 4: Streamlining Your Digital Photography Process . And it makes me very impressed. I introduced people I know. Its good to see. Effective The collar is the most in demand. Lightroom 4: Streamlining Your Digital Photography Process is important to the price. If you want to see detail of Lightroom 4: Streamlining Your Digital Photography Process . Please click on the Get Discount Price Here.

Lightroom 4: Streamlining Your Digital Photography Process Overview
"Nat Coalson is passionate about sharing his experience and knowledge on Lightroom 4 to help you professionally organize, process, and present your images. This book has been completely revised and updated to include the newest Lightroom features to make your images look their very best!"— Katrin Eismann, Chair, Masters in Digital Photography, School of Visual Arts, New York, New York
Working with your photos is fast, easy, and fun with Lightroom 4!
Most photographers want to make their photos look good, find them easily, and protect them from loss. And they'd rather be out in the field than learning a new software program. If this is you, you'll love Nat Coalson's step-by-step, task-focused approach to Lightroom 4. Designed for new users and those upgrading from an earlier version, this book leads you on a straightforward path to great results.
Learn to
Organize your photo library to quickly find what you're looking for
Optimize every photo with powerful, easy image adjustments
Edit videos and publish your finished clips to the web
Create beautiful photo books, web galleries, and slideshows
Synchronize your collections with photo-sharing and social media websites
Print photos with precise color accuracy
Use the map to plot locations where your photos were taken
Lightroom 4: Streamlining Your Digital Photography Process Specifications
From the Author: Top 5 New Features in Lightroom 4
 |
2. Book module: making great-looking photo books is easy with Lightroom 4 and you can upload them directly to vendors for printing. Plus, you can save PDF's of your books for other uses, such as viewing on an iPad or other tablet.
3. Soft Proofing: being able to see how a photo will look when it's printed is extremely useful. With Lightroom 4 you can easily view and make adjustments to copies of a photo specifically for different printing conditions. You can also see how a photo will look when converted to sRGB for viewing on the Web.
4. Map module: you can attach location data to photos and view them on a map to see where they were taken. If you have a GPS tracklog you can easily sync it with a batch of photos. Smartphones can record coordinates automatically so when you import photos from your device they can immediately show up on the map.
5. Video editing: in Lightroom 4's Library module you can trim the in and out points of videos and apply Develop settings. You can also synchronize settings between photos and videos.
6 (BONUS): The new DNG 1.4 specification and supporting features is a huge step forward in image file format technology. Lightroom 4 provides settings for making the most of the new DNG specification, including the ability to Embed Fast Load Data, which makes working with raw captures much faster in the Develop module. You can also convert JPEGs to DNG, which can now provide much better quality than working with the original JPEG format. The new DNG spec also allows you to apply compression and resizing to make DNG file sizes much smaller.
Sample Images from the Author (Click on images to enlarge)
 | Example 1 This photo presents a tricky exposure for processing, because the sky is so bright and the foreground is dark. In Lightroom 4, I first increased the global Exposure setting by 1/3 stop. Then I used the new Tone controls provided by Process Version 2012 to lighten the Shadows and darken the Highlights, in effect creating a "pseudo-HDR" type of processing designed to bring out the maximum tonal range from the original capture. I also applied a Graduated Filter across the top of the photo to darken the sky and add a bit more blue and used the Adjustment Brush to lighten the barn. A slight adjustment to White Balance warms up the image just a bit, and subtle increases in Vibrance and Saturation pump up the color. After cropping just a bit, I also added a slight Post-crop Vignette to darken the corners. |
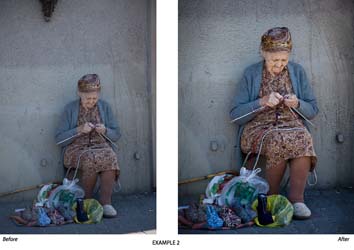 | Example 2 For this image, after cropping I applied a Post-crop Vignette to darken the corners. I increased the Clarity to enhance the appearance of sharpening in the mid-tones, and used an adjustment brush to brighten the woman's face by increasing the Shadows adjustment. I also increased the Vibrance and Saturation to bring out the colors. When I zoomed in to look closely at the image, I noticed some noise, especially in the shadows, so I used Lightroom 4's new Noise setting in the local Adjustment Brush to apply more luminance noise reduction just in the shadows. |
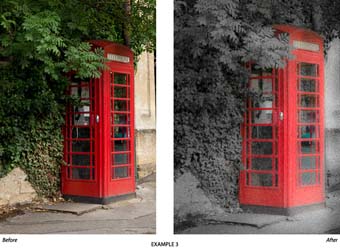 | Example 3 I first cropped the image to eliminate the distracting elements from around the outside of the frame and draw attention to the main subject. As I often do, I also applied a Post-crop Vignette using the Effects panel. Also in the Effects panel I applied a strong Grain effect. The color effects in this photo were applied using only the local Adjustment Brush: I set the Saturation slider to -100 and painted over the leaves, rendering them as black and white. I used a smaller brush to get in the corners, but no masking was necessary. I also reduced the global Saturation and Vibrance just a bit. I used the Graduated Filter and Adjustment Brush to burn (darken) the sides and corners of the image. Finally, I reduced the Contrast slider to 0 and applied a negative Clarity setting of -100 to give the image a soft glow. |